Thursday, January 31, 2013

Bilstein HD + H&R Spring Install

More than a year after completing the install, I have revisited the result.  Suffice it to say, I'm not very happy with my first attempt at suspension modifications and will try again.  Read more about it here.  (13-April-2014).
------------------------------------------------------------------------------------------------------------
As usual, I'm behind on the blog.  My "Porsche" time has been entirely consumed in my next project -- replacing the stock springs with a set of H&R Sport Springs.  Ella's been up on jack stands the last three weeks.  I think she looks kind of funny "floating" in the garage.  With just a bit of Photoshop magic to remove the jack stands...


There is a lot of information already available on the web for this install (search rennlist.com and visit http://p-car.com/diy/sus/), so I won't repeat it here.  I do have a few additional thoughts though:
Use a 7/8" oxygen sensor socket to remove the 22mm nut on the top of the front struts on a Porsche 993.
7/8" Oxygen Sensor Socket as a 22mm Strut Nut Socket
  1. The nut on top of the front struts was 22mm, not 21mm, for me.  I've read a few other places where people encountered this.  A very helpful employee at Pep Boys suggested that a 7/8" oxygen sensor socket should work just like the spark plug socket, and she was right. 
  2. Rear lower control arm boots were cracked. I have dedicated a separate post to the specific topic. Visit it here:  http://twofourthsfull.blogspot.com/2013/03/rear-control-arm-rubber-bootgasket.html


Tuesday, January 15, 2013

Porsche 993 Motor Mount Replacement

Sagging Porsche 993 motor mount.
Worn Porsche 993 C2 Motor Mount
Having read that motor mounts often wear out on the 993's, I decided to check into mine.  Here's the before photo. I think this shows the mounts clearly sagging, although I'm not sure because I've never seen a set of new 993 motor mounts.

The 993 C2 motor mounts were rather expensive, so I decided to go with the C4 mounts that were quite reasonably priced from Pelican.  For the removal, I followed the excellent write-up at pcarworkshop.com.

Some people have reported big improvements from this replacement, but to be honest I did not noticed much of a difference.  Maybe mine weren't really in bad shape or maybe I'm just not that aware.

Finally, I would like to give a big thanks to a couple friends who helped out with this little project.  It was a lot of fun!  Crazy to think we had the engine disconnected from the car...

Ella's First Outing

A couple of weeks ago, we took Ella out for her first public appearance at the January Cars & Coffee.  Here are a few photos of Ella and her brethren. 


For her next appearance, Ella will be showing off her new shoes and a new stance :-).

About This Blog

Why the strange name?

Just after buying Ella, I looked down and noticed that the gas gauge had denoted "half-full" as "2/4".  This both amused and appealed to me.  For some reason, I felt a connection to the Porsche engineers who chose those markings.  

I could have gone with four-fourths full for the blog name, but to be honest I am a little apprehensive about this experience.  Those who know me well, know that I don't often make big purchases (I like to think of myself as thrifty :-)).  But there's really nothing thrifty about buying and maintaining an older Porsche.  As it's our third car, I can't even justify some of its cost as my transportation.  

Why have this blog?

It's about the only free thing you can do with your Porsche ;-).  No, seriously, this blog is really just a journal of our journey with Ella.  We made it public in case there's anything that might be useful to anyone else.  There are several great websites for 993's that far exceed the depth that this one will ever attain.  I've already found www.pcarworkshop.comhttp://www.jackals-forge.com/ and http://www.p-car.com/ incredibly useful.  The forum posts on Pelican Parts and Rennlist are fantastic resources too.  

Friday, January 11, 2013

Porsche 993 Door Check Strap Repair

From my online browsing, I was aware that the door check straps are a known weakness on the 993 models.  When I got mine, neither door check strap had ever been broken, but the passenger side door was making an ominous clicking sound.

I followed the excellent instructions for this repair given on www.pcarworkshop.com here, so I won't repeat that information.  Through the steps, I did have a few deviations and notes.

1. I noticed that the door pocket had cracked around the screw hole by the door handle.  I used a bit of super glue for a quick fix, but I'll have to see how well this holds up.  I noticed the driver side had the same issue, so the design seems a bit poor.
 

2. This is probably obvious to the experienced weekend mechanic, but it is NOT necessary to remove the complete door panel.  Removing the speaker, at least with the basic audio system, is sufficient.  I'll remember this next time :-).

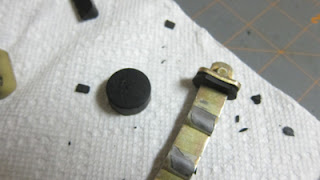
3. When I got the door check strap removed, I noticed that mine was missing a rubber "washer" for cushioning the door strap (orange rubber washer on the left photo below from pcarworkshop).  Rather than try to find the same washer, I cut one out of some door stop rubber purchased for a few dollars at my local auto parts store.  (Update:  when doing some other work on the driver side, I found this washer in the bottom of the door.  It was cracked and brittle and had fallen off this side too.  It seem that washer dies in something less than 17 years, at least in Texas).

Click on the picture for high rez imageMaking and repairing your own Porsche 993 door check strap washer.

When everything was re-assembled, I am happy to report that the clicking sound was gone.  I'm not sure if it was the overly tight check strap, the missing rubber washer or the fact that the bolts holding the check strap to the door fame were pretty loose, but it is fixed for now.  Fingers crossed nothing here breaks!

4. Months after doing this repair, I read a suggestion on forums.rennlist.com to place a deep socket over/around the head of the pin and use a c-clamp to push the pin out.  I much prefer this idea to hammering it out, which is what I did.  Of course, I haven't tried this approach so I don't know if it works, but it sounds promising.


Tuesday, January 8, 2013

My First Porsche Repair

For my first repair, I wanted to start simple.  I noticed that the outer layer on a wire in the engine bay had worn through.  I do not know if this was the original routing, but I am suspicious because the wire had to bend quite sharply as it was installed.   The image at right shows the bend, and the image below the damage to the wire.

For a very simple repair, I disconnected one end of the wire and applied a section of heat shrink tubing.  I re-installed the wire holder at a different angle to give the wire a more relaxed bend.  As I was finishing up and feel quite satisfied, I dropped the Philips screwdriver socket head into the engine bay!  You would have thought it would be sitting right there, but after 30min of searching with fingers, a flashlight, curse words, and magnetic grabber, I still couldn't find it.  Hopefully is lying on the side of the road somewhere by now...