 |
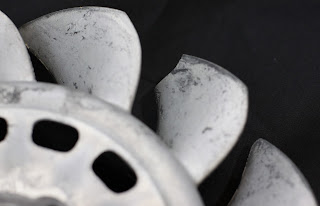
| Broken Blade Tip |
The Damage
The fan was missing two blade tips, and the fan housing was cracked around the alternator mount. So I decided to bite the bullet and order both new. I figured it would at least be easy, but Porsche had something else in store for me...
 |
| My Old Fan |
 |
| Cracks in the fan housing around the alternator mount and misshapen mounting holes. It looks worse in person. |
 |
| Evidence of the fan blades rubbing against the housing |
All of the damage was difficult to see when the fan and housing were installed, so it's hard to know how long it had been there. The damage appears (to me) to be consistent with the alternator or fan pulleys having been over-tightened at some point. It could also have been the result of over-tightening the strap that secures the fan housing, but it is harder to see how that would have lead to the the damage around the alternator mount.
 The New Fan
I placed an order for the new fan and housing from Sunset Porsche. When I opened the box containing the fan, I was greeted by a bubbly finish. I sent Sunset these photos, and they offered to check the condition of the other fans in their inventory.
Sunset reported that their entire inventory of fans had similar bubbles. A local powder coating shop told me that magnesium is known to be difficult to finish due to "out-gassing" producing bubbles in the finish. That said, I would expect Porsche and their suppliers to have worked out a process that yields better results than this.
I decided to sand the bubbles smooth, which required sanding all the way to the bare metal.
The New Fan Housing
The fan housing arrived and I immediately noticed a bunch of casting artifacts. I set about removing them with a small file and sandpaper. When it was all cleaned-up, I decided to see how it looked on my engine. I set it on the engine, and then I thought "Where is the AC bracket mount?"
Missing! The original (dark) housing is on the left and my new housing (shiny) is on the right. The AC bracket mount has been machined off.
 |
| 964 vs 993 Fan Housings |
 I quickly double checked the part numbers and the new housing had the correct part number on the label. I contacted Sunset again, and, long-story-short, the entire Porsche inventory of 993 fan housings had this issue. I couldn't get a new part until a new batch was fabricated (which turned out to be about 5 months). Good thing my project moves at a snail's pace ;-).
Along the way, I learned the difference between "casting" numbers (my terminology) and part numbers. 964.106.667.OR is cast into all three fan housing I have seen, and I refer to this as the "casting" number. The same casting is used to make both the 964/993-without-VarioRam and 993-with-VarioRam parts. For the earlier parts, the AC post is machined off and assigned part number 96410666702. The 993-with-VarioRam part number is 99310666703.
Painting
Inspired by Andreas and Keith from Rennlist, I elected to tackle painting my fan and housing on my own. Amazon associate links for reference below, although I only purchased the SprayMax through Amazon. My steps were:
- Lightly roughen surface of the fan and housing. Media blasting might have been better, but I did not have easy access to a media blaster. In hindsight, I probably should have gone to the trouble as I have already noticed a few places on the housing where the paint has chipped. Fortunately, they are in hard to see places.
- Clean thoroughly, using a prep spray for the last pass.
- Dupli-Color Engine Enamel with Ceramic - Primer
- Dupli-Color Engine Enamel with Ceramic - Cast Coat Iron for the fan housing
- Dupli-Color Engine Enamel with Ceramic - Aluminum for the fan
- SprayMax 2K clear for the fan. Please be aware of the safety precautions for painting with SprayMax 2K.
 |
| After Primer |
 |
| After Dupli-Color Iron Cast Coat |
 |
| After Dupli-Color Aluminum Coat |


very nice job. Enjoy you blog very much.
ReplyDeleteGood job Will. I continue to be impressed with your work. Not many people would take on such a job and pay attention to the details. Thanks for sharing your work.
ReplyDeleteMy pleasure, and thanks for the kind words.
DeleteI bought a new fan from Sunset as well, and noticed the same bubbling, but not to the extent I see here. It was a slight orange peel, so I just lived with it. Nice job on the respray, Will.
ReplyDeleteGlad to hear they're not all as bad as mine was.
DeleteMy fan was cracked so got a new one but it scrapes the housing...is it because housing is warped?
ReplyDeleteI would say most likely. The tolerance is pretty tight. Are there any scratch marks from the previous fan?
ReplyDelete