Monday, December 9, 2013
Friday, November 8, 2013
Porsche 993 AC Compressor Replacement
As mentioned in this previous post, Ella's AC compressor was suspected of leaking r-134a refrigerant and needed to be replaced. The repair quote from the mechanic was absolutely ridiculous, so I felt free to buy tools and equipment as well as the parts. :-D
For an excellent how-to article, check-out http://www.pcarworkshop.com/index.php/993_-_A/C_Evaporator_Replace. Although the title says "evaporator" replace, it also covers the compressor and the receiver/dryer. Rather than re-create the DIY here, I made a few small contributions to the article on pcarworkshop. Ella even makes a cameo appearance!
In this post, I will cover some of the special circumstances and considerations from my install.
Porsche 993 AC Bracket Repair
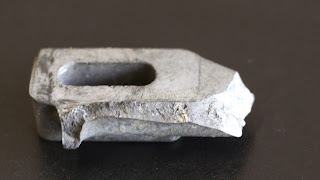 |
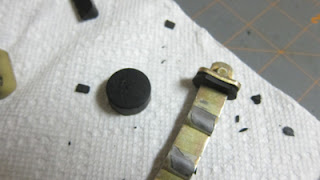
| Broken Piece of Porsche 993 AC Compressor Bracket |
You could see from the changes in color along the break that it had been cracked for sometime. I also know of one other 993 owner who experienced the same issue.
Sunday, September 15, 2013
Update: Porsche 993 Fog Light Reconditioning
In preparation for a bumperette delete and taking advantage of a Pelican Parts, I ordered "clear corner" lights for the 993. Excited to see how they would look, I popped them...and was pretty bummed.
A couple months ago, I painted the inside of the fog lights silver to take care of yellowing plastic (post here). The fogs look great on their own, but when I installed the clear corners, they don't match color wise. The fit between the corners and the fogs is not as tight as I would like either.
At this point, I have a couple of options:
A couple months ago, I painted the inside of the fog lights silver to take care of yellowing plastic (post here). The fogs look great on their own, but when I installed the clear corners, they don't match color wise. The fit between the corners and the fogs is not as tight as I would like either.
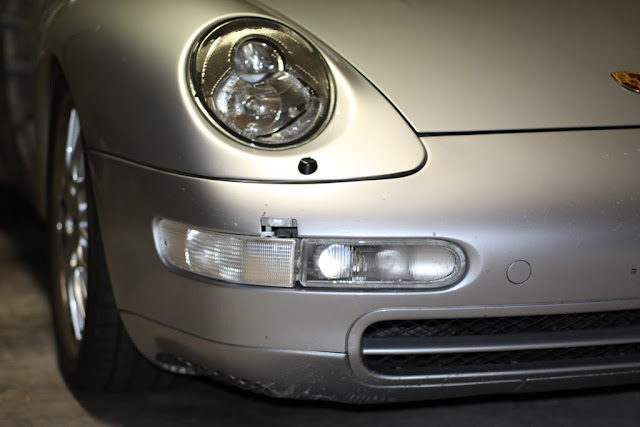 |
| Porsche 993 Fog Light and Clear Corners |
- Get over it
- Repaint the fog light plastic trying to match the clear corners
- Replace the fogs with one of the brake duct fog light replacements
- Swap clear corners for amber corners
Not sure which way I will go yet.
Tuesday, August 20, 2013
Off Topic: How to Coil a Cable, Hose, Cord, etc.
I found this video eye-opening. I have always tried to wrap cables, hoses, power cords, etc. neatly, but it never seems to work well. Turns out I was trying to do the wrong thing all along...
Thursday, August 15, 2013
Grounded!
As summer heated up here in Texas, Ella's AC seemed to be growing weaker. After one miserable hour driving around Dallas in the summer heat without effective AC, I took her in to the shop.
The mechanic noted the refrigerant was almost completely depleted, but couldn't find the source of the leak. He added dye and refrigerant and told me to return if I noticed poor AC performance. A few weeks later, it was time to head back to the mechanic.
This time, he diagnosed the problem as a leaking seal on the AC compressor. No problem, except that it would cost $2000 to repair with $1500 in parts alone. After a quick look at the DIY instructions and a search for parts prices indicating I could get the parts myself for $300-$400, I decided to tackle it myself...
It seems that maybe I got myself into a bit more than I first realized, but that story is for another post. :-)
 |
| The Culprit? |
This time, he diagnosed the problem as a leaking seal on the AC compressor. No problem, except that it would cost $2000 to repair with $1500 in parts alone. After a quick look at the DIY instructions and a search for parts prices indicating I could get the parts myself for $300-$400, I decided to tackle it myself...
It seems that maybe I got myself into a bit more than I first realized, but that story is for another post. :-)
Saturday, July 27, 2013
Porsche 993 Fog Light Reconditioning
Ella's fog lights needed some reconditioning. The passenger side fog light had been cracked by a large stone, and was very yellow. The driver side looked much newer -- like it had been replaced once already (hmm...don't remember that in the car's history, oh well...).
Friday, July 19, 2013
Porsche 993 Headlight Overhaul (or Ella's New Glasses)
Ella's headlights were looking a bit tired from the rock chips to the yellow-hued bulbs to the yellowed headlight lenses. She was ready for a makeover.
Sunday, July 7, 2013
Replacing Porsche 993 Third Brake Light Bulbs with LEDs
When I purchased Ella, she was sporting a gap-toothed look on the 3rd (middle, high mounted) brake light. This is really no surprise as the design uses 24 (yes, you read that right, 24) individual incandescent bulbs.
A quick search on rennlist revealed several others had the same thought I did: replace the incandescent bulbs with LEDs. Even better, several options had already been tried and validated. I just followed their lead. Read on for the details and lessons-learned in my install.
[Update 12-Feb-2016] I recently noticed that Tore at Bergvill FX is selling a kit to replace these incandescent bulbs with LEDs. While I haven't tried this specific product, my experience with Tore has been great on other products, and I would use his kit if I was to do this job again.
Thursday, June 27, 2013
Ella's 5-year PIP (Porsche Improvement Plan ;-))
My back log of projects is nearly complete, so I started day dreaming of where to go next. Based off a list I put together a while back, here's my "plan" for the next five years. The only thing that is certain is that this project that won't go according to plan. Have suggestions; please leave them in the comments below.
Sunday, June 16, 2013
"Temporary" Rock Guard Replacement for My 993
The clear rock guards on my 993 are in pretty sad shape. On both sides, chunks are missing and multiple rock hits have gone all the way down to the paint. They are also anything but "clear" or "paint colored".
I have been wondering if re-doing them in black would lend a nice retro look, and I found the perfect way to give it a trial: magnetic rock guards from MagnaGrafik (thanks to Bruce7 on rennlist for the pattern)..
I installed them over the existing stone guards so that I can go back anytime. Someday I hope to get the paint fixed, but until then this is a very budget friendly way to improve Ella's appearance. These looks so nice, we may even play with some additional magnetic decals :-).
 |
| Before After |
Labels:
911,
993,
Carrera,
Porsche,
Repair,
Rock Guard,
Stone Guard,
Upgrade
Thursday, May 30, 2013
Porsche 993 Online Media Catalog
A simple list of links to my favorite online Porsche 993 media. I will add to it as I go. Enjoy!
Buyer's Guide from Car&Driver: http://blog.caranddriver.com/1995-98-porsche-911-carrera-buyers-guide-econo-exotics/
Articles
A sentimental story from Road&Track: http://www.roadandtrack.com/features/magazine/features-magazine-features-breaking-promises-jack-baruth-porsche-911Buyer's Guide from Car&Driver: http://blog.caranddriver.com/1995-98-porsche-911-carrera-buyers-guide-econo-exotics/
Videos
Patrick Stewart narrating a Porsche Production
Porsche 993 - An Owners Perspective
Chris Harris's Review of the Singer 911
If you aren't familiar with the Singer 911, do NOT watch this video...you are better off ignorant ;-).
Blogs and Personal Websites
Photos
Porsche's 50 Years of 911 Photo Stream: http://50years.porsche.com/
Thursday, May 9, 2013
How to Install a Strut Tower Brace in a Porsche 993 (and drill-out a broken strut stud!)
 Installing a strut tower brace in Porsche 993 is really pretty simple, but I still managed to make it take forever. The brace discussed in this post is a TechArt model I bought used. The seller shipped it with absolutely fantastic packaging -- I've received new items with less professional packing.
 Read on for a few notes on the install.
Tuesday, April 23, 2013
Ella Has a New Stablemate
This weekend we bought a new car to replace the VW Beetle (bon voyage little green bug!). It is a 2012 Ford Focus 5-Door (aka hatchback) in the terrific candy blue color.
Why this car, you ask? Because T. loved it, of course!
Seriously though, we were looking at Ford because we wanted to add an American presence to our garage. The SUV options felt too big, and then we saw this hatchback. Did I mention the color? I think T. would have bought a horse carriage if they painted it this color! (Just kidding, honey ;-)).
Want to see it? Click past the break...
Sunday, April 21, 2013
Photo Scout Trip
We have been thinking of holding a car photo shoot at the Eisemann Center, so we swung by one evening to check it out (before dragging friends and family along).
Access to the fountain is limited to parallel parking on the street, and evening light is tough as it back lights the car. With proper flashes, however, we might get some very nice shots.
There are also several walls with simple geometric patterns that might serve well, and a couple of nearby fields with beautiful spring grass. We should go back soon!
Here's one shot we took on the scouting trip.
Side note: my first "professional" employment was in the building on the left about 15 years ago...
Thursday, April 18, 2013
All in the Stable
Monday, April 8, 2013
Sunday, March 24, 2013
Off Topic: Autoblog and I (separately) visit the Arctic
I recently returned from hunting the Northern Lights (aurora borealis) with my family. The very night we returned, Autoblog posted this article and video on their trip to the Arctic. Our paths exactly overlapped on for the Fairbanks to Coldfoot, AK portion of their trip. Fortunately, it was a little warmer when we visited.
It was a little strange seeing photos of very, very remote places you were standing published. I can even tell you the exact spot the photographer shot from when taking the northern lights photo (kudos to him for getting into that position!).
Enjoy!
Saturday, March 23, 2013
Porsche Photoshoot, March 2013: Ella Makes a Friend
Ella made a friend for this photoshoot.
Whereas the February shoot turned out more good photos than I expected, I struggled with this one. The light was a bit harsh, I was using a wide angle lens for the first time and the disparity in the cars' colors all contributed. Fortunately, I happened across a professional photographer and he offered some pointers. Hopefully the next shoot will be better!
Whereas the February shoot turned out more good photos than I expected, I struggled with this one. The light was a bit harsh, I was using a wide angle lens for the first time and the disparity in the cars' colors all contributed. Fortunately, I happened across a professional photographer and he offered some pointers. Hopefully the next shoot will be better!
Wednesday, March 13, 2013
Bug Infestation!
I arrived home tonight to find my driveway infested with green beetles! I guess I should be kinder to Porsche family relatives ;-).
Monday, March 11, 2013
New Mats!
My parents got me two new floor mats custom fit for my 993 -- a much needed replacement! Thank you :-). I love the red "Porsche" logo. Here is a side-by-side comparison of new and old (the photo is a very good representation of the real appearance).
I was initially concerned about the shape difference, but Lloyd's included a note saying the shape had purposely been improved. They fit great, and I was very happy that Lloyds included the plastic nut for attaching the floor mats to post on the floor.
I was initially concerned about the shape difference, but Lloyd's included a note saying the shape had purposely been improved. They fit great, and I was very happy that Lloyds included the plastic nut for attaching the floor mats to post on the floor.
Sunday, March 10, 2013
A Commitment
"I will not buy any more parts for Ella until I finish installing the parts I already have." -Me
[Update July 9, 2013: The projects are all done. I can start shopping again! :-)]
My enthusiasm for buying (or receiving as a birthday gift :-)) parts for Porsche projects has outpaced my ability to actually get the projects done. It has gotten a little out of hand, so I decided to use this "public" commitment as a motivational tool.
Here are the outstanding projects:
- [Done] Door handle gasket replacement. Parts 99353763100 and 99353762100.
- Front lighting upgrade
- [Done] HID upgrade from Bergvill FX.
- [Done] Headlight lens replacement
- [Done] Fog lamp repair. Instructions on Rennlist here.
- [Done] Protect headlight and fog lamp lenses with Lamin-X lens protective film.
- [Done] LED 3rd brake light replacement. Disassembly here and LED info here.
- [Done] Install (used) TechArt strut tower brace.
Thursday, March 7, 2013
Rear Control Arm Rubber Boot/Gasket Repair

Update 21-Apr-2014: After more than a year and 2500 miles, the repairs looks to holding up well. I can't tell for sure without removing the control arm, but installed there are no visible openings in the boot.
-----------------------------------------------------------------------------------------
While installing the H&R springs, we tore the rubber boot on the rear lower control arm (Part number 99333104301). This was easy to do as the rubber was clearly worn around its typical crease position.
This ball joint is press-fit into the control arm with the rubber boot as an integrated part of the assembly. Despite significant effort, I couldn't find anyone who could replace it, or any boots that even came close to having the same design. (If anyone does know of either, leave it in the comments!). The other option is to replace the entire assembly, but that is over $200 to fix a worn boot!
After a bit of searching on the web, I found two different suggestions for dealing with this issue: 1. use silicone sealant to repair the gap or 2. make a patch with a bike tire tube.
My plan is to try the silicone sealant first, and fall back on the bike tire tube if necessary.
Here are the steps I followed.
2. Clean the area. I used an alcohol swab. I doubt this is the best cleaner, but figured it was good enough.
3. Apply the silicon sealant.
Wednesday, March 6, 2013
Photoshoot: Feb. 2013
During the last week of Feb, we had a little impromptu photo shoot. I took advantage of some terrific evening light and the hill behind our house, and had a little fun with my camera.
Leave a vote for your favorite and/or any constructive criticism in the comments.
Leave a vote for your favorite and/or any constructive criticism in the comments.
 |
| Photo #1 |
 |
| Photo #2 |
 |
| Photo #3 |
 |
| Photo #4 |
 |
| Photo #5 |
Thursday, February 28, 2013
Window Scraper Removal

On Ella's driver side door, there was a bit of tape curving out from underneath the window scraper. Being detail oriented, this deviation from the beautiful lines of the car really bothered me.
I was prepared for this to be a big task, and figured I would do it while replacing the door handle seals. I removed the inner door panel and door handle, but I still could not see how to remove it. There is a little black plastic piece at the front end of the window scraper, so I thought "if I remove that, maybe something will be more obvious". Pull...snap/crack...expletive...retreat...search for answer on web and fail...ask for help on rennlist (thank you rennlisters)...success!

In case anyone else is retracing my steps, it is unbelievably easy to remove this window scraper. Pull up on it starting at the rear of the door and it will pop out quite easily.
I plan to do this every time I wax the car to prevent wax build-up along this joint.
That little broken piece (993-531-429-02) from the front of the window scraper is turning out to be a little difficult to find in stock. Either lots of people break theirs...or no one does :-).
Porsche Perception
I have found driving Ella alters the way I look at driving in unexpected ways.
When starting the car, I turn off the radio to enjoy the song from the engine rather than turn it on to mask the rattles.
When planning a route, I maximize the number of curves rather than minimize the time required.
When the light ahead turns red, I smile at the opportunity to row through the gears again rather than groan at the delay.
These aren't things I do conciously, but instead self-observations made after it's already happened.
Wednesday, February 6, 2013
A "Cheap" Suspension Fix
As long as I've owned the car, there's been a metal-on-metal banging sound that sounded as though it was coming from the passenger-side rear suspension. At first it seemed random, but I eventually discovered that anytime I unloaded the right side suspension, you would hear it.
I checked under the car and the engine bay and couldn't find anything loose or any sign of metal-on-metal contact. We pulled most of the rear suspension while changing the springs and again, no sign of anything amiss. But the noise persisted, so I resigned myself to having the mechanic find it.
And he did...buried beneath the passenger seat and wedged under the carpet, he found this.
I am trying to view the $55 it cost me to find it (I believe it really did take the mechanics $55 worth of time) as an inexpensive suspension repair rather than a very expensive piece of trash.
Sunday, February 3, 2013
New Shoes for a New Stance
Four weekends later, Ella has her new stance and some new shoes to match! I am thrilled with the look, a little bummed at the condition of the rear wheels (bought used on eBay), and disappointed (but not surprised) that the clunking/clanking in the passenger side rear suspension is still there.
She's off for her alignment and a professional diagnosis of the rear suspension clunking noise tomorrow. Once that's done, I will get some better "glamour" shots to post.
 |
| Here she is trying on her new shoes. |
 |
| And on the ground for the first time. That nasty wheel gap is gone...but have I gone too far? |
Ella's Red Under Where?
 Ever since I've learned about powder coating metal, I've been keen to give it a try. While working on my lowering spring install, I noticed that a metal panel under the car had a few rust spots. Actually, Porsche spot-welded some washers onto the panel, which were rusting; the main panel was fine.
I took the panels over to my new friends at Ace Powder Coating, and they offered me a nice price on powder coating the metal panels as well as the top and bottom hats of the of the front strut. I figured these were great places to try out powder coating since no one would ever see it.
Here are the parts back from the powder coating. I should have taken a before shot, but they were just black painted metal.
And a shot of the metal trays installed. Ella's now got a little surprise waiting underneath. ;-)
"I could hide out under there...
I just made you say "underwear."
from Pinch Me by the Barenaked Ladies
I've loved that lyric for years!
Thursday, January 31, 2013
Bilstein HD + H&R Spring Install
More than a year after completing the install, I have revisited the result. Suffice it to say, I'm not very happy with my first attempt at suspension modifications and will try again. Read more about it here. (13-April-2014).
------------------------------------------------------------------------------------------------------------
As usual, I'm behind on the blog. My "Porsche" time has been entirely consumed in my next project -- replacing the stock springs with a set of H&R Sport Springs. Ella's been up on jack stands the last three weeks. I think she looks kind of funny "floating" in the garage. With just a bit of Photoshop magic to remove the jack stands...
There is a lot of information already available on the web for this install (search rennlist.com and visit http://p-car.com/diy/sus/), so I won't repeat it here. I do have a few additional thoughts though:
 |
| 7/8" Oxygen Sensor Socket as a 22mm Strut Nut Socket |
- The nut on top of the front struts was 22mm, not 21mm, for me. I've read a few other places where people encountered this. A very helpful employee at Pep Boys suggested that a 7/8" oxygen sensor socket should work just like the spark plug socket, and she was right.
- Rear lower control arm boots were cracked. I have dedicated a separate post to the specific topic. Visit it here: http://twofourthsfull.blogspot.com/2013/03/rear-control-arm-rubber-bootgasket.html
Tuesday, January 15, 2013
Porsche 993 Motor Mount Replacement
 |
| Worn Porsche 993 C2 Motor Mount |
The 993 C2 motor mounts were rather expensive, so I decided to go with the C4 mounts that were quite reasonably priced from Pelican. For the removal, I followed the excellent write-up at pcarworkshop.com.
Some people have reported big improvements from this replacement, but to be honest I did not noticed much of a difference. Maybe mine weren't really in bad shape or maybe I'm just not that aware.
Finally, I would like to give a big thanks to a couple friends who helped out with this little project. It was a lot of fun! Crazy to think we had the engine disconnected from the car...
Ella's First Outing
A couple of weeks ago, we took Ella out for her first public appearance at the January Cars & Coffee. Here are a few photos of Ella and her brethren.
For her next appearance, Ella will be showing off her new shoes and a new stance :-).
About This Blog
Why the strange name?
Just after buying Ella, I looked down and noticed that the gas gauge had denoted "half-full" as "2/4". This both amused and appealed to me. For some reason, I felt a connection to the Porsche engineers who chose those markings.
I could have gone with four-fourths full for the blog name, but to be honest I am a little apprehensive about this experience. Those who know me well, know that I don't often make big purchases (I like to think of myself as thrifty :-)). But there's really nothing thrifty about buying and maintaining an older Porsche. As it's our third car, I can't even justify some of its cost as my transportation.
Why have this blog?
It's about the only free thing you can do with your Porsche ;-). No, seriously, this blog is really just a journal of our journey with Ella. We made it public in case there's anything that might be useful to anyone else. There are several great websites for 993's that far exceed the depth that this one will ever attain. I've already found www.pcarworkshop.com, http://www.jackals-forge.com/ and http://www.p-car.com/ incredibly useful. The forum posts on Pelican Parts and Rennlist are fantastic resources too.
Friday, January 11, 2013
Porsche 993 Door Check Strap Repair
From my online browsing, I was aware that the door check straps are a known weakness on the 993 models. When I got mine, neither door check strap had ever been broken, but the passenger side door was making an ominous clicking sound.
I followed the excellent instructions for this repair given on www.pcarworkshop.com here, so I won't repeat that information. Through the steps, I did have a few deviations and notes.
1. I noticed that the door pocket had cracked around the screw hole by the door handle. I used a bit of super glue for a quick fix, but I'll have to see how well this holds up. I noticed the driver side had the same issue, so the design seems a bit poor.

2. This is probably obvious to the experienced weekend mechanic, but it is NOT necessary to remove the complete door panel. Removing the speaker, at least with the basic audio system, is sufficient. I'll remember this next time :-).
3. When I got the door check strap removed, I noticed that mine was missing a rubber "washer" for cushioning the door strap (orange rubber washer on the left photo below from pcarworkshop). Rather than try to find the same washer, I cut one out of some door stop rubber purchased for a few dollars at my local auto parts store. (Update: when doing some other work on the driver side, I found this washer in the bottom of the door. It was cracked and brittle and had fallen off this side too. It seem that washer dies in something less than 17 years, at least in Texas).
I followed the excellent instructions for this repair given on www.pcarworkshop.com here, so I won't repeat that information. Through the steps, I did have a few deviations and notes.
1. I noticed that the door pocket had cracked around the screw hole by the door handle. I used a bit of super glue for a quick fix, but I'll have to see how well this holds up. I noticed the driver side had the same issue, so the design seems a bit poor.

2. This is probably obvious to the experienced weekend mechanic, but it is NOT necessary to remove the complete door panel. Removing the speaker, at least with the basic audio system, is sufficient. I'll remember this next time :-).
3. When I got the door check strap removed, I noticed that mine was missing a rubber "washer" for cushioning the door strap (orange rubber washer on the left photo below from pcarworkshop). Rather than try to find the same washer, I cut one out of some door stop rubber purchased for a few dollars at my local auto parts store. (Update: when doing some other work on the driver side, I found this washer in the bottom of the door. It was cracked and brittle and had fallen off this side too. It seem that washer dies in something less than 17 years, at least in Texas).
When everything was re-assembled, I am happy to report that the clicking sound was gone. I'm not sure if it was the overly tight check strap, the missing rubber washer or the fact that the bolts holding the check strap to the door fame were pretty loose, but it is fixed for now. Fingers crossed nothing here breaks!
4. Months after doing this repair, I read a suggestion on forums.rennlist.com to place a deep socket over/around the head of the pin and use a c-clamp to push the pin out. I much prefer this idea to hammering it out, which is what I did. Of course, I haven't tried this approach so I don't know if it works, but it sounds promising.
Tuesday, January 8, 2013
My First Porsche Repair
For my first repair, I wanted to start simple. I noticed that the outer layer on a wire in the engine bay had worn through. I do not know if this was the original routing, but I am suspicious because the wire had to bend quite sharply as it was installed. The image at right shows the bend, and the image below the damage to the wire.


For a very simple repair, I disconnected one end of the wire and applied a section of heat shrink tubing. I re-installed the wire holder at a different angle to give the wire a more relaxed bend. As I was finishing up and feel quite satisfied, I dropped the Philips screwdriver socket head into the engine bay! You would have thought it would be sitting right there, but after 30min of searching with fingers, a flashlight, curse words, and magnetic grabber, I still couldn't find it. Hopefully is lying on the side of the road somewhere by now...


For a very simple repair, I disconnected one end of the wire and applied a section of heat shrink tubing. I re-installed the wire holder at a different angle to give the wire a more relaxed bend. As I was finishing up and feel quite satisfied, I dropped the Philips screwdriver socket head into the engine bay! You would have thought it would be sitting right there, but after 30min of searching with fingers, a flashlight, curse words, and magnetic grabber, I still couldn't find it. Hopefully is lying on the side of the road somewhere by now...
Subscribe to:
Comments (Atom)


