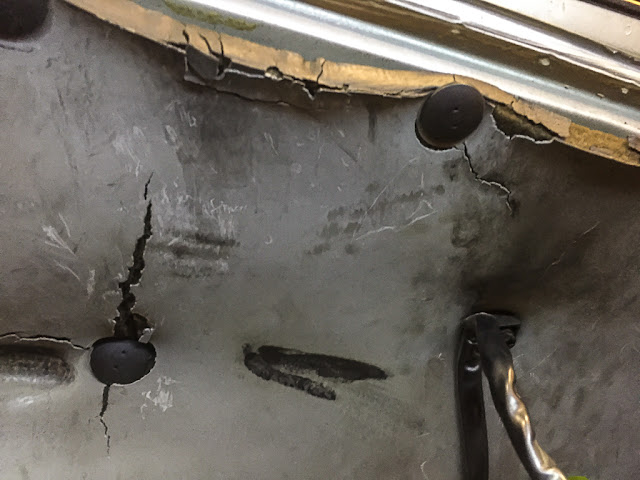
Out with the old
As is common, my 993's engine pad was in sad shape. There is no easier time to replace it than when the engine is out...
Removing the old one was easy, but cleaning off the old adhesive on the engine bay was a tedious chore.
In with the new
I ordered the AppBiz Ultimate Engine Sound Pad from Pelican Parts (here). The pad consists of three layers - foam, synthetic felt, and ripstop-style nylon reinforced foil. The construction and quality of the pad appears first rate.
Following tips on Rennlist, I removed pad material (the felt is nearly impossible to cut!) where the pad was pre-cut for the hood hinge mounts and the hoses on the both lower corners of the pad. Next I test fit the pad, which was an enormous hassle as the pad kept getting stuck on the studs as I tried to slide it between the hoses and the body. Once it was in place, I found it nearly impossible to punch holes for the studs through the felt layer. After struggling for a while, I stepped back and thought "how could the manufacturer possibly cut this pad to shape?"
 The answer I came-up with was a "hot" knife. Hmm...I have a super cheap soldering iron around somewhere. I dug it out, verified the tip had a similar diameter to the body studs and grabbed a scrap piece of engine pad from the hinge cut out. Once the soldering iron heated up, I pressed it into the scrap piece, and it cut through it like...a hot knife through butter ;-). A quick note - burning the pad produces fumes that are probably not good for your health. I worked in a well ventilated area and wore a respirator. I intended to post a link to the soldering iron, but when I searched for this model soldering iron, I learned it had been recalled due to fire and shock risk.
Magnets, why?
I read a suggestion on one of the forums to use magnets rather than spray-adhesive to install a new engine pad. Given my recent frustration at having to clean out the old adhesive, I decided to give it a try. If I was to do it again, I'd just use the adhesive.
For magnets, I initially thought of using magnetic adhesive tape, but the magnetic adhesive tape demagnetizes at 80°C. Next, I looked into neodymium magnets, which are stronger than common ceramic magnets, but the common N-grade ones also demagnetize at 80°C. If this area of the car reaches 80°C, I probably have bigger concerns than the engine pad, but nonetheless I decided to play it safe with standard ceramic magnets and their 250°C max operating temperature (X-bet MAGNET ™ - Ceramic Industrial Magnets - Grade 5 - 100pcs).
I ordered a neoprene 3M adhesive to glue the magnets to the engine pad (3M 1300 Neoprene High Performance Rubber & Gasket Adhesive, Yellow).
 Using the soldering iron trick, I hollowed out spaces for 46 magnets on the back of the pad. I glued them in, taking a bit of care to alternate the polarity of the magnets. This too was probably not necessary, but the pad sits close to the rear speakers and I didn't want a magnetic field from my engine pad creating some sort of hum in the rear speakers (is this even possible?).
  |
| Magnets glued in the back of the Ultimate Sound Pad |
Installed
 |
| Ultimate Engine Sound Pad, Installed |
 |
| Ultimate Engine Sound Pad, Installed |
 |
| Ultimate Engine Sound Pad, Installed |
The PadKeeper
I had also read about David Etter's PadKeeper on Rennlist. Hoping to never need to complete this task again, I decided to install a PadKeeper as well. David shipped me a PadKeeper the same afternoon I ordered it and two days later it was on my front porch. (Thanks David!) Following David's suggestion, I removed the thin layer of insulation on the the inside of the PadKeeper (the Ultimate Sound Pad is quite thick) and popped it into place. I used a Dremel to remove a bit of plastic from the lip on the passenger side to get a little better fit. Overall, the PadKeeper is impressively executed and David was great to work with.
 |
| 911 PadKeeper, Installed |
 |
| 911 PadKeeper, Installed |


No comments:
Post a Comment